I’ll walk you through how I built a two-step approval process using Microsoft Power Automate, with outcomes saved to a SharePoint list. This setup allows approvals to be tracked, logged, and managed centrally with clear outcomes such as Approved or Rejected.
The Business Need
We needed an automated solution to:
- Route approval requests through two separate reviewers, one after the other.
- Log the final decision (approved/rejected) in a SharePoint list.
- Ensure transparency and traceability of the approval process.
- Avoid errors caused by missing data or skipped actions.
Flow Logic Overview
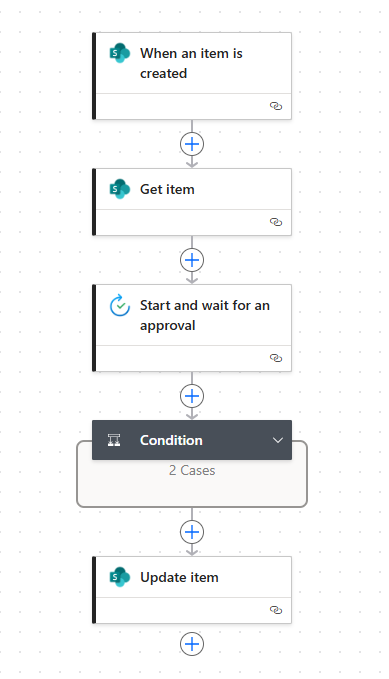
To begin with, approval flow consists of the following key steps:
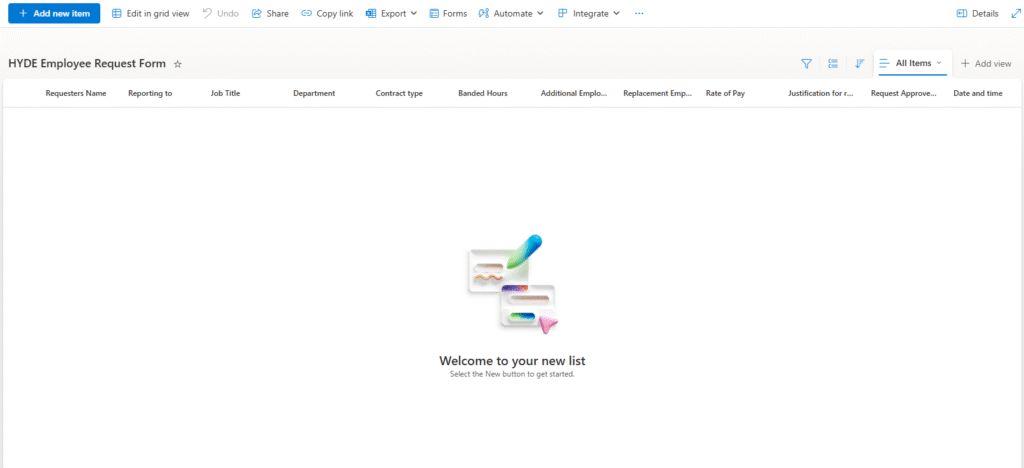
- List: The flow needs a list to start the whole process.
- Identify each of the variable you need to record.
- Examples: Name, role, Contract type, Name of requeater, managers name;
- Trigger: The flow begins when a SharePoint item is created or modified.
- Get Item: Retrieves details of the item from SharePoint to ensure required fields (like Title) are included.
- Approval Step 1: Sends the first approval request to Reviewer 1.
- Conditional Check:
- If Rejected, update SharePoint
ApprovalStatusto"Rejected"and end the flow. - If Approved, continue to Step 2.
- If Rejected, update SharePoint
- Approval Step 2: Sends a second approval request to Reviewer 2.
- Final Conditional Check:
- If Rejected, update
ApprovalStatusto"Rejected". - If Approved, update
ApprovalStatusto"Approved".
- If Rejected, update
- Send Email (optional): Notify stakeholders or log confirmation.
Here is a link for Manage sequential approvals with Power Automate – Power Automate | Microsoft Learn
Handling Null Errors
Power Automate can be strict about data types. To avoid the common "One or more fields provided is of type 'Null'" error:
- I used the
coalesce()function to ensure all values (e.g., number fields) have a fallback value.formatNumber(coalesce(triggerOutputs()?['body/Amount'], 0), 'N2') - I ensured required SharePoint fields like
Titlewere always included in the Update item actions using values from theGet itemstep.
Getting errors with null fields – Power Automate | Microsoft Learn
My use of AI of handling Null Errors. I found it very useful to copy the JSON code from the Power Automate flow and input it into ChatGPT. This allowed me to locate the problems that occurred.
ChatGPT also guided me on how to properly structure the Update item action, making sure that required fields were always included using values from the earlier Get item step, such as:
"Title": "@outputs('Get_item')?['body/Title']"
Using AI in this way not only saved me time but also deepened my understanding of how Power Automate handles data types and errors under the hood. It became a powerful debugging tool that helped me improve both the stability and resilience of my approval workflow.
SharePoint Integration
Each approval result is written back to SharePoint using the Update item action.
- The
ApprovalStatusfield is a custom column that stores values like:"Approved""Rejected"
Here’s a snippet of the fields I update:
"parameters": {
  "dataset": "https://<your-tenant>.sharepoint.com",
  "table": "<your-list-guid>",
  "id": "@outputs('Get_item')?['body/ID']",
  "Title": "@outputs('Get_item')?['body/Title']",
  "ApprovalStatus": "Approved" // or "Rejected"
}
Final Thoughts
This flow creates a scalable, transparent, and user-friendly two-step approval process that integrates deeply with SharePoint. It’s ideal for scenarios like:
- Expense approvals
- Time-off requests
- Vendor or contract approvals
Power Automate’s flexibility combined with careful error handling allows for a robust solution that can grow as business needs evolve.
Leave a Reply